
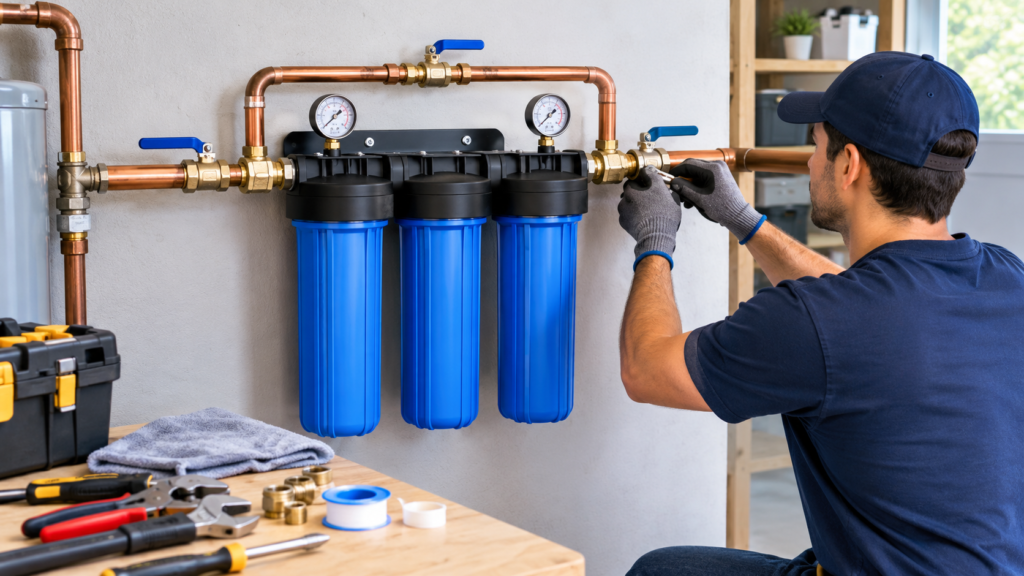
Introduction
How to Install a Whole House Water Filter Yourself: 8 StepsYou have a whole-house water filter sitting in the garage and a plumber’s quote you would rather not pay.
Many homeowners can install one in a single afternoon, and the scorecard below shows in two minutes whether you are one of them. Then eight timed steps take you from the main shutoff to a flushed, leak-checked system.
Table of Contents
Quick Answer: Installing a whole-house water filtration system can take around three to five hours for someone with suitable DIY plumbing skills. Before starting, make sure you know how to operate the home’s main water valve, identify the existing pipe material, and confirm that local regulations permit homeowner installation. Position the filter according to the manufacturer’s instructions, include a bypass arrangement where appropriate, and reopen the water supply gradually. Inspect all connections for leaks shortly after installation and check them again the following day.
What You Need to Know
- Three questions are hard stops: a main shutoff that closes fully, a known pipe material, and local rules that allow the work.
- City water: install after the main shutoff.For homes that rely on a private well, place the filtration system downstream of the pressure tank, following the manufacturer’s installation instructions.
- Fit a three-valve bypass so you can change cartridges without shutting off the whole house.
- Examine for leaks at 15 minutes and again at 24 hours, and record pressure before and after.
Can you install a whole house water filter yourself?
A DIY installation may be suitable for homeowners who know how to stop the main water supply, recognize their plumbing pipe type, and use compatible connectors correctly. However, professional assistance is recommended if the main valve cannot stop the water completely, the plumbing uses old galvanized pipes or a shared supply line, or local regulations require a licensed plumber to modify the home’s main water connection..
Cutting into the pipe that feeds your entire home is stressful, and that caution is healthy. Most of the risk comes from three things: a valve that will not seal, a joint made with the wrong method, and skipped leak checks.
A whole house water filter, also called a point-of-entry filter, is a filter assembly installed on the main water line, used to treat water before it reaches every fixture in the home. The EPA’s home water treatment guidance separates point-of-entry systems from point-of-use filters and notes that whole-house systems treat large volumes of water and can require plumbing changes.
The outcome falls into three tiers: DIY, DIY with a plumber’s inspection afterward, or hire a professional from the start. The scorecard below sorts you into one.
Should you DIY it? The Go/No-Go scorecard
Answer eight questions; if you miss any of the three hard stops, hire a professional or fix that item first. The rest of the score decides between full DIY and DIY with an inspection.
| # | Question | “Yes” means | Hard stop if No? |
|---|---|---|---|
| 1 | Does the main shutoff close fully? (Water stops at an open faucet within about one minute.) | The valve seals | Yes |
| 2 | Have you identified the pipe as copper, PEX or CPVC? | You know the joint method | Yes |
| 3 | Do you have the fittings and tools for that pipe type? (See the table in the next section.) | You can make a sound joint | No |
| 4 | Have you confirmed local rules allow homeowner plumbing, or obtained the permit? | The work is lawful | Yes |
| 5 | Is there room for the housing plus the clearance your manual requires to remove each sump? | Cartridges can be changed later | No |
| 6 | Can a stud, wall block or floor stand carry the housing when it is full of water? | The unit is supported | No |
| 7 | Have you measured static water pressure with a hose-bib gauge, and is it within your filter’s rated range? | Pressure matches the product | No |
| 8 | Can you leave the water off for about 4 hours, with buckets and towels ready, and re-check for leaks 24 hours later? | You can finish and verify | No |
How to score it:
- Any “No” on questions 1, 2, or 4: hire a professional, or resolve that item before you buy fittings.
- 5 “Yes” answers on questions 3, 5, 6, 7, and 8: DIY.
- 3–4 “Yes” answers: DIY, then pay a licensed plumber to inspect and pressure-test the work.
- 0–2 “Yes” answers: hire a professional.
Save or screenshot this Go/No-Go scorecard—it covers the decision you need to make before buying a single fitting.
Want the scorecard as a one-page printable for your garage wall? Join the Filter Expert Hub newsletter, and we will send it with our next water-filter guide
What do you need before you start?
A whole-house filter installation needs the filter assembly, three shutoff valves for a bypass, fittings matched to your pipe type, and basic cutting tools. Gathering everything first avoids a mid-job hardware store run while your water is off.
Parts:
- Filter housing set with bracket, wrench, and cartridges
- 3 shutoff valves (inlet, outlet, and bypass) sized to your pipe; 3/4-inch and 1-inch lines are common
- 2 unions or push-fit connectors so the housing can be removed
- Fittings and adapters for your pipe type
- PTFE tape for threaded joints
- 2 pressure gauges (optional, but they give you a baseline)
Tools:
- Pipe or tubing cutter for your pipe material, plus a deburring tool
- 2 adjustable wrenches
- Drill and driver, stud finder, level, tape measure
- Hose-bib pressure gauge
| Pipe material | Common DIY joining methods | Difficulty | Watch for |
|---|---|---|---|
| Copper | Push-to-connect or compression fittings; soldered (sweat) joints | Moderate (fittings) to hard (soldering) | Cut square and deburr; open flame near framing is a fire risk |
| PEX | Crimp or clamp rings, or push-fit fittings | Easy to moderate | Rings and fittings must match the PEX size; crimping needs a dedicated tool |
| CPVC | Primer and solvent cement, or push-fit transition | Moderate | Brittle plastic; follow the cement can for cure time before pressure; do not overtighten threaded adapters |
| PVC | Solvent cement | Moderate | Confirm the pipe is rated for potable water pressure |
| Galvanized steel | Threaded steel fittings | Hard | Corrosion inside can crack or clog old pipe when disturbed; hire a plumber |
Verify the filter’s claims before you buy. The NSF certified drinking water treatment unit directory lets you look up the exact model and see what it is certified to reduce.
Where should a whole house water filter go: city water vs. well water?
On city water, install the filter just after the main shutoff and meter; on a private well, install it after the pressure tank. In both cases, place it before the branches that should receive treated water.
City water
Mount the filter on the cold-water main after the main shutoff valve and meter and after any backflow device your utility requires. Keep it upstream of the water heater branch so both hot and cold water are treated. Leave room to reach the main shutoff without moving the filter..
Private well
One installation guide advises placing the filter after the pressure tank when the home runs on a well. Guidance for well-water point-of-entry systems places treatment near the pressurized storage tank as well. Leave the pump, pressure switch, and tank untouched. If your well water has iron, hardness, or bacteria problems, a lab test should decide whether a sediment cartridge alone is enough.
What to leave out
Use the filtration unit only within its specified temperature range. Decide deliberately about irrigation and outdoor hose bibs: excluding them reduces the volume the filter treats and the flow it must handle. Write the decision on a tag at the filter so a later repair does not change it.
Will the filter be big enough? A worked flow example
According to the U.S. Department of Energy, the federal maximum for a showerhead is 2.5 gallons per minute (gpm), and 2.2 gpm for a bathroom or kitchen faucet. Add the fixtures that could run at the same time:
| Fixture running at once | Flow (gpm) |
|---|---|
| Shower 1 | 2.5 |
| Shower 2 | 2.5 |
| Kitchen faucet | 2.2 |
| Total (before appliances) | 7.2 |
Add any dishwasher or washing machine cycle on top. Choose a housing rated above your total, and treat the manufacturer’s rated flow as a ceiling, not a target. An undersized filter is the usual reason showers weaken after installation.
How to install a whole house water filter (8 steps)
The install takes eight steps and roughly 3.7 hours: test the shutoff, plan the layout, mount the bracket, cut the pipe, join the fittings, set the housing, restore pressure slowly, then flush and record a baseline. Read all eight before you shut off the water.
- Locate and test the main shutoff (5 minutes). Close the main valve fully, open the lowest faucet in the house, and watch the flow stop within about a minute. If water keeps trickling, the valve is failing, and you should stop here. While the water is still on, record static pressure with a hose-bib gauge. Typical household pressure is 40–60 psi, and US plumbing codes generally treat anything above 80 psi as too high.
- Plan the layout on the wall (20 minutes). Sketch the order along the flow: main shutoff, inlet valve, filter, outlet valve, with the bypass valve on a short pipe linking the inlet and outlet sides. Add a union on each side of the housing and, if you have gauges, one before and one after. Dry-fit everything on cardboard first and mark the arrow showing flow direction (IN to OUT).
- Mount the bracket (25 minutes). Screw the bracket into a stud or solid blocking with the fasteners your manual specifies, then check it with a level. Position the housing so there is room to drop the sump below it.
- Shut off, drain and cut the pipe (40 minutes). Close the main, open the lowest and highest faucets, and wait until the flow stops. Mark the cut using your dry-fit, cut the square with a cutter made for your pipe, then deburr the edges. Place a bucket under the cut; expect a quart or more to drain. Before you cut metal pipe, ask whether it carries your home’s electrical grounding: in many older homes the metal water line is part of that path, and a cut can break it unless an electrician bonds around the gap.
- Join the fittings for your pipe type (70 minutes). Follow the joining method for your pipe in the table above. On threaded joints, wrap male threads 3–4 times with PTFE tape in the tightening direction (clockwise). Do not tape compression or push-fit ferrules. Support the pipe on both sides so the housing never carries the pipe’s weight. For cemented CPVC or PVC, wait out the cure time printed on the cement can before applying pressure.
- Set the housing and cartridges IN to OUT (15 minutes). Match the housing’s IN and OUT markings to your flow arrow. Remove the plastic wrap from every cartridge before it goes in. Seat the O-ring cleanly, lubricate it only as the manual allows (silicone grease is common; petroleum products can damage the seal), then hand-tighten the sump and give it the small wrench turn the manual specifies. If you are installing in an RV instead, the sequence differs; how to install an RV water filter.
- Restore pressure slowly and check every joint (30 minutes). Set the bypass open and the filter’s inlet and outlet valves closed. Open the main slowly, run a faucet to purge air, then open the inlet valve slowly and press the housing’s pressure-relief button until water appears. Recheck at 24 hours.
- Flush and record a baseline (15 minutes). Close the bypass, then run a cold tap until the water is clear; your manual sets the exact time, but 5–15 minutes is common for carbon cartridges. Write the date, pressure before and after the filter, and the cartridge model on a tag fixed to the bracket. A growing gap between those two pressure readings over the following weeks is your cue to change the cartridge.
Do you need a permit to install a whole house water filter?
Maybe permit and licensing rules for plumbing changes are set locally, so ask your building or plumbing department before you cut. Some jurisdictions exempt small homeowner jobs; others require a permit or a licensed installer for any change to the main line.
The International Plumbing Code’s chapter on permits and inspections describes permits as the local authorization for regulated plumbing work, and each jurisdiction adopts its own exemptions. Do not rely on a manufacturer’s “DIY-friendly” label to answer that question.
When you call, give your address, the scope (“installing a filter with a bypass on the main water line, altering pipe”), and who will do the work. Also read your filter’s warranty terms, since some tie coverage to installation per the manual.
What should you check after installing a whole house water filter?
. A weekly glance at the gauges afterwards costs you ten seconds.
- Day 0: dry paper towel on each joint at 5 and 15 minutes.
- Day 1: repeat the towel check, and confirm the bypass and filter valves are in their normal positions.
- Day 7: record pressure before and after the filter at the same flow, and compare with your baseline tag.
Cartridge life depends on your water and on the cartridge type, so follow the manual. Learn how to confirm the filter is working, how to test if your water filter is working, and compare the logic of replacement timing in how often you should replace an RV water filter.
Carbon cartridges strip chlorine from the water, which also removes the disinfectant that helps protect your downstream pipes from bacterial growth. Run taps after long absences, and read the CDC’s home water treatment guidance
What are the most common installation mistakes?
The most frequent problems come from reversed flow, missing air purges, unremoved cartridge wrap, and overtightened housings. Most are fixable in minutes once you recognize the symptom.
| Symptom | Likely cause | Fix |
|---|---|---|
| Weak flow after install | Undersized housing, clogged cartridge, a valve not fully open, or a kinked connector | Open every valve fully; compare gauge readings; check the flow rating against your total demand |
| Leak at the sump | Pinched or dry O-ring, or a cross-threaded sump | Depressurize, remove the sump, reseat a clean lightly lubricated O-ring, retighten |
| Water spits at the faucets | Air trapped in the lines | Open faucets one at a time until the flow is steady |
| Black specks in the water | Carbon fines from new cartridges | Run a cold tap until it clears |
| No water at all | Inlet or outlet valve closed with the bypass closed | Open the bypass, then recheck each valve position |
| Housing cracked | Overtightened sump or a wrench used where hand-tight was specified | Replace the housing; tighten per the manual only |
| Short cartridge life | Reversed IN and OUT, or heavy sediment | Confirm the flow arrow; add a sediment pre-filter stage |
The mistake installation guides warn about most is skipping the 24-hour recheck, because slow leaks often show up only after joints have cycled under pressure.
When should you call a plumber instead?
Call a plumber when the shutoff will not seal, the pipe is galvanized or shared, or the job touches a well’s pressure controls, a backflow device, or the electrical bonding. Stopping at the right moment is a skilled call, not a failure.
- The main shutoff will not close, and there will be leaks around the stem.
- The pipe is galvanized steel, unidentified or damaged.
- The service line is shared with another unit or feeds fire protection.
- The work changes backflow protection, a pressure tank, or a pump’s controls.
- Static pressure sits outside your filter’s rated range, or you measure it above 80 psi.
- Your local authority requires a licensed installer.
- Your water has an active advisory or a positive bacteria test; a cartridge alone will not fix that.
Frequently Asked Questions
Is It Possible to Install a Whole-House Water Filtration System Without a Plumber?
Yes, if you can close your main shutoff, identify your pipe material, join it with the correct fittings, and confirm local rules allow homeowner plumbing. Plan on 3–5 hours for a first install. Use a licensed plumber when the shutoff fails, the pipe is galvanized, or a permit requires a professional.
How to Set Up a Whole-House Water Filter for Well Water
Install it after the pressure tank, on the line leading into the house, with a three-valve bypass. Leave the pump, pressure switch, and tank untouched. Test your well water first, because iron, hardness, or bacteria may need treatment beyond a single sediment or carbon cartridge. Check pressure against the filter’s rated range before cutting any pipe
What Problems Should You Consider Before Installing a Whole-House Water Filter?
The main drawbacks are a pressure drop that grows as cartridges clog, regular cartridge changes, an undersized unit starving showers during peak use, and a possible permit requirement. Carbon cartridges also remove chlorine, which leaves downstream plumbing without that disinfectant. A properly sized unit with a gauge and a maintenance schedule limits these problems.
How to Install a Whole-House Water Filter: A Practical Guide
Fit it in eight steps: test the main shutoff, plan the layout, mount the bracket, drain and cut the pipe, join fittings suited to your pipe type, set the housing with flow running IN to OUT, restore pressure slowly while checking every joint, then flush the cartridges and record pressure readings as a baseline.
How long does it take to install a whole house water filter?
A bypass is not always required by the product, but it is strongly advisable. A three-valve bypass (inlet, outlet, and bypass) lets you isolate the filter, change cartridges, and keep water flowing to the house. Without one, every cartridge change means shutting off the whole home’s water.
Can Installing a Whole-House Water Filter Affect Water Pressure?
Every filter adds some resistance, so pressure after the filter will be lower than before it. A correctly sized unit usually causes only a modest drop, but a clogged cartridge or undersized housing makes it worse. Record pressure before and after the filter at installation, then compare readings over time to know when to change cartridges.
How much does it cost to install a whole-house water filter yourself?
Costs vary widely by system and pipe type, and published figures conflict. DIY costs are the filter, three valves, fittings for your pipe, tape, and tools; the savings come from skipping labor. Ask a plumber for an itemized quote covering equipment, labor, permit, and startup testing, then compare that with your parts list.
What to do next
Your filter is in, and the next questions are usually about verification and fit.
- Confirm the system is working with how to test if your water filter is working.
- Plan cartridge changes with how often you should replace an RV water filter.
- Traveling or parking an RV? See how a house system differs in RV water filter vs. house filter before you try to reuse any part of this setup.