
introduction
how to install an RV water filter You’ve arrived at a campsite, connected the freshwater hose, and now you’re staring at the RV water filter, wondering which end goes where. The beneficial news: most inline RV water filters install in minutes once the water flow direction and hose connections are clear.
Table of Contents
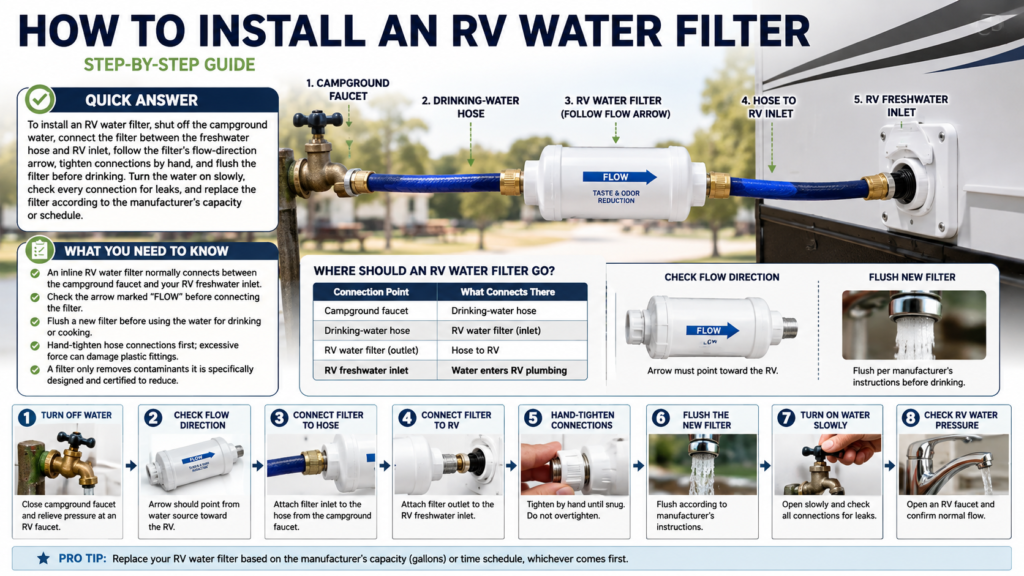
Quick Answer: To install an RV water filter, shut off the campground water, connect the filter between the freshwater hose and RV inlet, follow the filter’s flow-direction arrow, tighten connections by hand, and flush the filter before drinking. Turn the water on slowly, check every connection for leaks, and replace the filter according to the manufacturer’s capacity or schedule.
What You Need to Know
- An inline RV water filter normally connects between the campground faucet and your RV freshwater inlet. .Check the arrow marked “FLOW” before connecting the filter.
- Flush a new filter before using the water for drinking or cooking.
- Hand-tighten hose connections first; excessive force can damage plastic fittings.
- A filter only removes contaminants it is specifically designed and certified to reduce
How Do You Install an RV Water Filter?
Installing an RV water filter usually means connecting the filter to the freshwater hose before the hose enters the RV.
For a typical inline filter, the basic sequence is
Campground faucet → drinking-water hose → RV water filter → RV inlet
Some manufacturers may recommend a different arrangement, so the filter instructions should take priority.
What do you need?
Before starting, gather:
- 1 RV-compatible drinking-water hose
- 1 inline RV water filter
- Hose washers or gaskets if required
- A pressure regulator if your RV setup requires one
- A clean cloth for wiping fittings
Do not connect a filter to a visibly damaged or contaminated hose.
Step 1: Turn off the campground water
Close the campground faucet before making any connections.
Starting with the water off prevents sudden pressure from entering the hose while you install the filter.
If the RV is already connected to city water, turn off the campground faucet and relieve pressure at an RV faucet before disconnecting the hose.
Step 2: Check the filter’s flow direction
Find the arrow showing the direction of water flow on the filter housing.
The arrow should point from the campground water source toward the RV.
For a standard inline arrangement:
Water source → hose → filter → RV
Never assume that both ends of an inline filter work in either direction. Follow the arrow printed on the actual filter
Step 3: Connect the filter to the freshwater hose
Attach the filter inlet to the end of the drinking-water hose coming from the campground faucet.
Make sure the hose fitting starts straight and the rubber washer is seated correctly.
Cross-threading a plastic fitting can cause leaks or permanently damage the connection.
Step 4: Connect the filter to the RV
Attach the filter outlet to the RV freshwater inlet using the second hose connection.
The completed setup should have the filter positioned between the campground water supply and the RV inlet.
Keep the filter supported rather than allowing its full weight to hang from a fitting.
Where Should an RV Water Filter Go?
For a typical city-water connection, an inline RV water filter goes between the potable-water hose and the RV freshwater inlet.
The common arrangement is:
| Connection point | What connects there |
|---|---|
| Campground faucet | Drinking-water hose |
| Hose outlet | RV water filter |
| Filter outlet | Connection to RV |
| RV inlet | Filtered water enters RV |
This location lets the filter treat incoming water before the water enters the RV plumbing.
Should the filter go before or after the hose?
The filter is normally installed at the end of the freshwater hose closest to the RV, so the flow is:
Campground faucet → hose → filter → RV
That arrangement also makes the filter easy to inspect and replace.
Always follow the specific filter manufacturer’s instructions if the recommended configuration differs.
How Do You Connect an Inline RV Water Filter?
An inline RV water filter connects using standard hose-style fittings, with the filter installed in the water path before the RV inlet.
Most inline filters are designed to be simple enough that no permanent plumbing modification is necessary.
Before connecting:
- Confirm the fittings match.
- Check that the rubber washers are present.
- Inspect the filter for damage.
- Confirm the flow arrow.
- Make sure the freshwater hose is intended for potable water.
A useful rule is to keep every connection clean. Dirt on a gasket or fitting can create a leak even when the filter itself is working correctly.
How Do You Know Which Way an RV Water Filter Goes?
The filter’s flow arrow should point toward the RV.
Look for markings such as:
- FLOW
- IN / OUT
- An arrow
- WATER IN / WATER OUT
If the filter has clearly marked inlet and outlet ports, follow those markings instead of relying on the shape of the filter.
Installing a filter backward may restrict flow or prevent the filter from operating as intended.
What Does an RV Water Filter Actually Remove?
An RV water filter removes only the contaminants included in its specific performance claim.
A filter marketed for taste and odor improvement should not automatically be assumed to remove bacteria, viruses, lead, or other health-related contaminants.
The CDC recommends checking a filter’s label and certification claims to determine what the filter is designed to remove. For example, CDC guidance notes that filters with an absolute pore size of 0.3 micron or smaller can remove bacteria, while different technologies and pore sizes address different microorganisms.
NSF explains that NSF/ANSI 42 generally covers aesthetic effects such as chlorine, taste, and odor, while NSF/ANSI 53 covers specific health-related contaminant reduction claims. The certification does not mean a filter removes every contaminant; the specific reduction claim matters.
A simple filter-selection reference
| What you want to reduce | What to check |
|---|---|
| Chlorine taste and odor | NSF/ANSI 42 claim or manufacturer specification |
| Sediment/particles | Micron rating and certified performance claim |
| Cysts | Appropriate NSF/ANSI 53 or other verified cyst-reduction claim |
| Bacteria | Absolute pore size and technology specifically rated for bacteria |
| Lead | Specific lead-reduction certification/claim |
| PFAS | Specific certified PFAS reduction claim |
| Viruses | Appropriate membrane technology and verified claim |
A surprising point: a smaller-sounding micron number does not automatically tell you everything about a filter’s performance. CDC distinguishes between absolute and mean pore size, because a mean pore size does not guarantee that every pore is that size or smaller.
For health-related contaminant concerns, check the exact certification and contaminant claim instead of buying based only on the words “high-quality” or “premium.”
What Is the Best Way to Install an RV Water Filter at a Campsite?
The best basic setup is a potable-water hose connected to the campground faucet, followed by the filter, followed by the RV freshwater inlet.
Before turning on the water:
- Inspect the hose.
- Check the filter’s flow arrow.
- Confirm the washers are seated.
- Hand-tighten the fittings.
- Support the filter so its weight is not hanging from the RV inlet.
- Open the faucet slowly.
- Check for leaks.
- Flush the filter according to its instructions.s.
If campground water quality is uncertain, check local water advisories or the campground’s water information rather than assuming that filtration alone makes every water source safe.
Inline vs. Canister RV Water Filters: Which Setup Is Easier?
Inline filters are usually simpler to install, while canister systems offer more flexibility for larger or replaceable cartridges.
| Feature | Inline filter | Canister system |
|---|---|---|
| Installation | Usually very simple | More involved |
| Hose connections | Usually direct | May require fittings |
| Cartridge replacement | Often replace entire filter | Usually replace cartridge |
| Setup time | Short | Longer |
| Space required | Low | Higher |
| Best for | Simple campsite filtration | Custom or higher-capacity setups |
For a traveler who wants a quick connection at different campsites, an inline filter can be convenient.
For a more permanent or customized filtration arrangement, a canister system may provide additional options.
How Do You Prevent Leaks After Installing an RV Water Filter?
Most installation leaks come from damaged washers, cross-threaded fittings, loose connections, or poorly aligned hoses.
Use this quick check:
| Symptom | First thing to check |
|---|---|
| Drip at campground faucet | Hose washer and faucet connection |
| Drip at filter inlet | Washer and fitting alignment |
| Drip at filter outlet | Washer and thread alignment |
| Water around RV inlet | Connection tightness and damaged fitting |
| Low flow | Filter condition, hose restriction, or pressure |
| Water stops after a short time | Clogged/restricted filter or supply issue |
Turn the water off before correcting a leaking connection.
Do not keep tightening a leaking plastic fitting indefinitely. If the washer is damaged or missing, replacing the washer is often more appropriate than applying more force.
What Are the Most Common RV Water Filter Installation Mistakes?
The most common mistakes are installing the filter backward, forgetting the washer, skipping the initial flush, and assuming every filter removes the same contaminants.
Installing the filter backward
Check the arrow before connecting either side.
Forgetting the rubber washer
A missing washer can cause a persistent leak even when the threaded fitting appears tight.
Using the wrong hose
Use a hose designed for potable drinking water rather than assuming an ordinary garden hose is suitable for drinking-water service.
Skipping the flush
A new filter may require flushing before normal drinking-water use. Follow the manufacturer’s stated flushing instructions.
Ignoring the filter’s capacity
A filter does not last indefinitely simply because water still flows through it.
Replacement should follow the manufacturer’s capacity, time recommendation, or condition indicators.
Treating filtration as disinfection
A filter designed for sediment and taste improvement should not be treated as a universal disinfecting system.
CDC recommends checking the filter’s specific capabilities and maintaining filters according to manufacturer instructions.
RV Water Filter Installation Reference Chart
Use this chart when connecting a typical inline RV water filter:
| Checkpoint | Correct setup | Warning sign |
|---|---|---|
| Water source | Campground potable-water faucet | Unknown or questionable source |
| Hose | Potable-water hose | Damaged or unsuitable hose |
| Filter direction | Arrow points toward RV | Arrow points toward faucet |
| Washer | Properly seated | Missing, cracked, or displaced |
| Filter position | Supported between hose and RV | Heavy filter hanging from inlet |
| Water startup | Faucet opened slowly | Full pressure immediately |
| First use | Filter flushed as directed | No initial flushing |
| Leak check | All fittings remain dry | Dripping connection |
| Maintenance | Manufacturer schedule followed | Filter far beyond rated capacity |
Save or screenshot this RV water filter installation reference chart — it covers the complete connection and inspection sequence at the campsite.
For more detailed maintenance guidance, see how often to replace an RV water filter.
For broader maintenance steps, continue with how to maintain a water filter.
What if the RV will be stored for winter?
Winter storage requires more than simply shutting off the campground faucet.
Water left inside an RV plumbing system can create problems when temperatures fall below freezing. Follow the RV manufacturer’s winterization procedure and the filter manufacturer’s storage instructions.
You can also read how to winterize an RV water filter before storing the RV.
What Equipment Do You Need for an RV Water Filter?
Once the basic installation is understood, the most useful equipment is the filter itself, a potable-water hose, compatible fittings, and any pressure-control equipment required by the RV setup.
For the commercial equipment step, a suitable [AFFILIATE LINK: RV inline water filter] can be mentioned here because the reader has already learned how and where the filter is installed. The product should be evaluated by its contaminant claims, flow requirements, capacity, connection compatibility, and certification rather than by marketing language alone.
NSF recommends checking the actual standard and contaminant-reduction claim associated with a certified filtration product.
If your newsletter covers practical RV water-care reminders, a natural email capture line is
Get practical RV water-filter reminders, maintenance tips, and replacement guidance sent to your inbox.
Frequently Asked Questions
How do you install an RV water filter?
Install an RV water filter between the potable-water hose and the RV freshwater inlet, with the filter’s flow arrow pointing toward the RV. Turn the campground water off, connect the fittings with their washers properly seated, hand-tighten the connections, flush the filter according to its instructions, then turn the water on slowly and check for leaks.
Which way should an RV water filter face?
An RV water filter should normally face in the direction indicated by the manufacturer’s flow arrow. For a typical city-water connection, water travels from the campground faucet through the potable-water hose, into the filter, and then into the RV. If the filter has separate inlet and outlet markings, follow those markings rather than guessing based on the filter’s shape.
Where should you put an RV water filter?
An inline RV water filter is normally placed between the potable-water hose and the RV freshwater inlet. This allows incoming campground water to pass through the filter before entering the RV plumbing. The filter should be positioned securely so its weight does not place unnecessary stress on the RV inlet or hose fittings.
Do you need to flush a new RV water filter?
Yes, a new RV water filter should be flushed according to the manufacturer’s instructions before normal drinking-water use. The required flushing amount varies by filter model, so there is no single gallon amount that applies to every product. Follow the manufacturer’s stated flushing procedure rather than using a generic flush volume.
Can an RV water filter remove bacteria?
Some filtration systems can reduce bacteria, but an ordinary RV inline filter should not automatically be assumed to remove bacteria. CDC guidance states that filters designed for bacteria removal may use an absolute pore size of 0.3 micron or smaller, ultrafiltration, nanofiltration, or reverse osmosis. Always verify the specific product’s certified performance claim.
Does an RV water filter make unsafe water safe to drink?
Not necessarily. An RV water filter only addresses the contaminants and microorganisms for which the filter is designed and rated. A basic sediment or taste-and-odor filter should not be treated as a universal purifier or disinfection system. Check the source-water advisory, filter certification, and manufacturer’s contaminant claims before relying on filtered water for drinking.
How do you install an RV water filter?
Install an RV water filter between the potable-water hose and the RV freshwater inlet, with the filter’s flow arrow pointing toward the RV. Turn the campground water off, connect the fittings with their washers properly seated, hand-tighten the connections, flush the filter according to its instructions, then turn the water on slowly and check for leaks.
Which way should an RV water filter face?
An RV water filter should normally face in the direction indicated by the manufacturer’s flow arrow. For a typical city-water connection, water travels from the campground faucet through the potable-water hose, into the filter, and then into the RV. If the filter has separate inlet and outlet markings, follow those markings rather than guessing based on the filter’s shape.
Where should you put an RV water filter?
An inline RV water filter is normally placed between the potable-water hose and the RV freshwater inlet. This allows incoming campground water to pass through the filter before entering the RV plumbing. The filter should be positioned securely so its weight does not place unnecessary stress on the RV inlet or hose fittings.
Do you need to flush a new RV water filter?
Yes, a new RV water filter should be flushed according to the manufacturer’s instructions before normal drinking-water use. The required flushing amount varies by filter model, so there is no single gallon amount that applies to every product. Follow the manufacturer’s stated flushing procedure rather than using a generic flush volume.
Can an RV water filter remove bacteria?
Some filtration systems can reduce bacteria, but an ordinary RV inline filter should not automatically be assumed to remove bacteria. CDC guidance states that filters designed for bacteria removal may use an absolute pore size of 0.3 micron or smaller, ultrafiltration, nanofiltration, or reverse osmosis. Always verify the specific product’s certified performance claim.
Can an RV water filter remove bacteria?
Not necessarily. An RV water filter only addresses the contaminants and microorganisms for which the filter is designed and rated. A basic sediment or taste-and-odor filter should not be treated as a universal purifier or disinfection system. Check the source-water advisory, filter certification, and manufacturer’s contaminant claims before relying on filtered water for drinking.
What to Do Next
Installing the filter is only the first part of keeping RV water flowing cleanly.
Your next logical steps are:
- Read how often to replace an RV water filter to plan filter changes.
- Follow how to maintain a water filter to keep the system working properly.
- If you are ready to compare equipment, continue to [CONTENT GAP: Best RV Water Filters commercial page] as the commercial bridge.