
introduction
How to Winterize Your RV Water Filter You’ve drained the tanks, blown out the lines, and poured antifreeze down every drain—and then you spot the water filter bolted under the sink or on the outside wall and realize nobody told you what to do with it. It’s a five-minute job once you know the sequence, and skipping it is one of the most common ways RVers discover a cracked housing in April instead of a clean startup.
Table of Contents
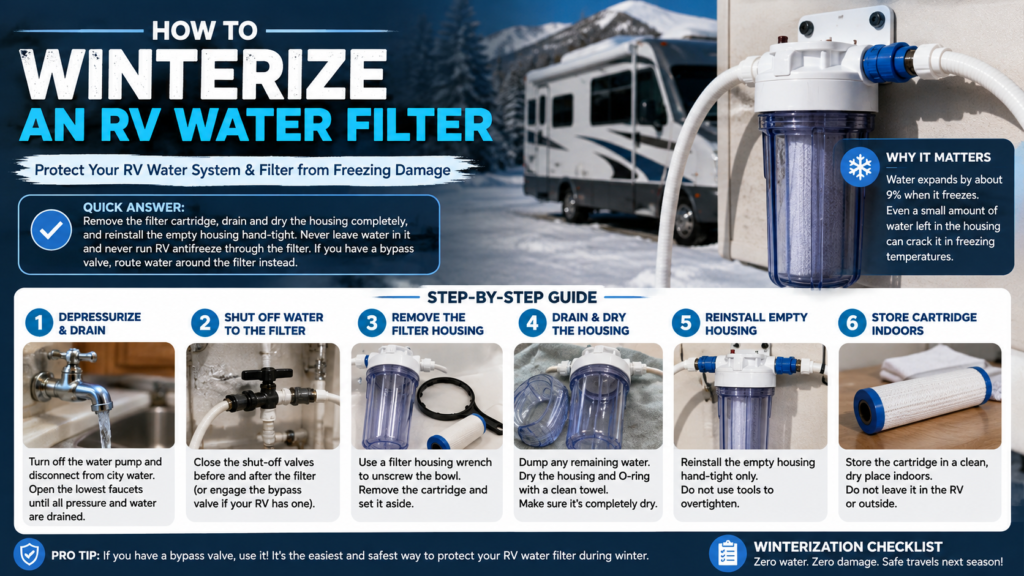
Quick Answer: Remove the filter cartridge, drain and dry the housing completely, and reinstall the empty housing hand-tight — don’t leave water in it, and don’t run RV antifreeze through carbon filter media. If your setup has a bypass valve, route water around the filter entirely instead. Either way, the goal is zero standing water anywhere near the filter before the first severe freeze.
What You Need to Know:
- Water expands by about 9% in volume when it freezes, and that expansion is what splits plastic filter housings—not the cold itself.
- The cartridge should almost always come out before storage, regardless of which winterizing method you use.
- Never pump antifreeze through carbon filter media—it soaks into the carbon and leaves a taste that’s nearly impossible to flush out.
- A bypass valve, if you have one, is the cleanest solution and skips the disassembly step entirely.
- Hand-tighten an empty housing before storage—a wrench-tightened empty bowl is a common cause of spring cracks.
Why Your RV Water Filter Needs Winterizing
Water trapped inside a sealed plastic housing has nowhere to go when it freezes, and that’s what breaks the housing—not the temperature drop by itself. According to the U.S. Geological Survey, water’s density decreases by about 9% as it turns to ice, meaning the same amount of water takes up more space as a solid.
In an open pipe, that expansion can escape upstream. In a filter housing—a sealed, rigid canister—it can’t. The pressure has to go somewhere, and that’s usually the threaded collar or the base seam.
Here’s the part that surprises most owners: it’s rarely the ice itself doing the damage. Engineers who study frozen-pipe failures have measured the pressure from confined freezing water at up to roughly 43,500 psi, compared to a standard copper water line rated for around 1,500 psi. A plastic filter housing has far less margin than that copper pipe. Even a small amount of leftover water at the bottom of the bowl is enough to crack it.
Which Method Do You Need? (Decision Table)
Not every RV needs the same approach. Save or screenshot this table — it covers every common setup and tells you exactly which method applies to yours.
| Your Setup | What to Do |
|---|---|
| You have a bypass valve installed | Close off the filter loop and route water directly past it. No disassembly needed — this is the cleanest option if you already have one. |
| No bypass valve, storing for winter | Remove the cartridge, drain and dry the housing, reinstall it empty and hand-tight. |
| Camping in freezing temps (not storing) | Use a heated water hose and insulate the exterior housing rather than removing the filter — you still need filtered water. |
| RV has a reverse osmosis (RO) system | RO membranes are more freeze-sensitive than carbon or sediment cartridges. Remove the membrane and store it separately, following the manufacturer’s specific storage instructions — don’t treat it like a standard cartridge. |
| Inline filter (not a canister) | Disconnect it from the water line, drain it fully by holding it vertically, and store it indoors rather than leaving it connected outside. |
Do You Need to Remove the Cartridge?
Yes, in almost every case. Leaving a cartridge inside an empty-looking housing still traps residual water in the filter media itself, and that water freezes just like any other.
The only exception is a properly plumbed bypass setup, where the cartridge and housing are isolated from the water system entirely and no water reaches them at all.
How to Winterize Your RV Water Filter, Step by Step
Step 1: Depressurize and Drain the System
Turn off your RV’s water pump and disconnect from any city water connection. Open the lowest faucets in the RV, including the exterior shower, until pressure and flow stop completely.
This relieves pressure at the filter housing before you touch it, so you’re not opening a pressurized canister.
Step 2: Remove and Empty the Cartridge
Place a towel or small bucket under the housing to catch residual water. Using a filter wrench, turn the housing ring counterclockwise to loosen it, then unscrew the bowl fully and slide the cartridge out.
Pour out any standing water in the bottom of the bowl. If the cartridge still has useful life left, don’t discard it—the storage steps below cover keeping it for next season.
Step 3: Inspect and Dry the Housing
Wipe the interior threads and sealing surfaces with a dry cloth. Check the rubber O-ring in the filter head groove for flattening, cracking, or stiffness—a dried-out O-ring is one of the most common causes of leaks to the following spring.
Apply a thin layer of food-grade silicone lubricant to the O-ring to keep it flexible through the cold months.
Step 4: Reinstall the Empty Housing, Hand-Tight Only
crew the clean, fully dry housing bowl back onto the filter head. Hand-tighten it—do not use a wrench.
Plastic contracts in cold weather, and a housing that’s over-tightened in the fall can crack under that added stress once temperatures drop further. Mark the date on a piece of tape so you know when it was last serviced.
Storing the Cartridge Over Winter
If your cartridge has meaningful life left, rinse it under clean tap water to remove surface debris, then shake it out to expel trapped water. Let it air-dry completely for 24 to 48 hours in a well-ventilated space — a damp cartridge sealed in a bag is an invitation for mold.
Once it’s fully dry, seal it in a clean plastic bag and store it somewhere climate-controlled, above freezing — a closet works fine. If you’re not sure how much life the cartridge has left, it’s worth checking how long RV water filters typically last before deciding whether storing it is even worth the effort — sometimes a fresh cartridge in spring is the simpler call.
Common Mistakes That Crack Housings
The single most common winterizing mistake is pumping RV antifreeze directly through a carbon filter cartridge still installed in the line. Propylene glycol-based antifreeze absorbs into the carbon’s pore structure and is extremely difficult to flush out completely, which is why filtered water can taste off for weeks after storage.
Other frequent errors:
- Leaving any water—even a shallow layer—in the bottom of the housing bowl.
- Wrench-tightening an empty housing instead of hand-tightening it.
- Blowing compressed air through a filter with the cartridge still installed, which creates back-pressure that can crack the housing head or tear the filter media.
- Assuming a bypass valve is installed when it isn’t—verify your system before skipping the removal steps.
Reinstalling in Spring
When you’re ready to use the RV again, check that the O-ring is still supple and properly seated, install a fresh or properly stored cartridge, and hand-tighten the housing. Run 5 to 10 gallons of water through the system before drinking from it to flush out any sanitising solution or antifreeze residue left in the lines.
This is also the right moment to confirm the filter is actually still doing its job rather than assuming it is. If you want a reminder for exactly when to run through this checklist next spring, that’s the kind of thing worth setting up now rather than trying to remember in April.
FAQs
How do I winterize my RV water system?
Winterizing the full RV water system involves draining the fresh water tank and water heater, blowing out or antifreezing the lines, and treating the holding tanks separately with non-toxic antifreeze. The water filter is a distinct step within that process—it needs its own removal and drying procedure, since it’s a sealed component that the general line-blowing process doesn’t fully protect.
How long will an RV water filter last?
Cartridge lifespan depends on water quality and usage, typically ranging from a few months to about a year for standard sediment and carbon filters. Storing a cartridge properly over winter doesn’t extend its total lifespan — it just pauses the clock. See how long RV water filters last for specifics by filter type.
How do I winterize my RV water pump?
The water pump is typically winterized as part of the broader fresh water system process: run it until the lines are drained of water, or use it briefly to help push antifreeze through the plumbing if you’re using that method. It isn’t disassembled the way a filter housing is.
How do I store RV water filters when not in use?
Rinse the cartridge, air-dry it fully for 24 to 48 hours, then seal it in a plastic bag and store it in a climate-controlled space above freezing. A damp cartridge stored in a sealed bag risks mold growth, so drying time matters more than most people expect.
Does RV antifreeze damage a carbon water filter?
Yes. Propylene glycol-based RV antifreeze absorbs into carbon filter media and is difficult to fully remove, often leaving a persistent taste in filtered water afterward. Always remove carbon cartridges before running antifreeze through the plumbing, rather than pumping it through the filter itself.
Can I skip winterizing the filter if I have a bypass valve?
Yes, if the bypass valve properly isolates the filter housing from the rest of the water system. Confirm the valve is fully engaged and no water is reaching the housing—a partially closed bypass can still leave standing water inside.
What to Do Next
Before you close up the RV for winter, it’s worth a quick gut-check on the filter itself: how to test if you actually need a water filter walks through whether your current setup is worth protecting through storage or replacing come spring. If you’re dealing with off-tasting water even with a filter installed, why filtered water sometimes tastes bad covers the most common causes — including leftover antifreeze from a rushed winterizing job.