
introduction
how does an RV water filter work You just hooked up to a campground spigot, or you’re staring at a filter cartridge you installed last week, wondering what it’s actually doing to your water before it hits your glass. Here’s a detailed, step-by-step explanation of what occurs inside that housing.
Table of Contents

Quick Answer:: An RV water filter works by forcing incoming water through a porous filter media — usually activated carbon or a pleated sediment layer — that physically traps particles and chemically adsorbs chlorine, bad taste, and odour. Most RV filters are rated between 5 and 20 microns, small enough to catch sediment and rust but not certified to remove bacteria or viruses.
What You Need to Know:
- RV water filters clean water through two mechanisms working together: mechanical straining and chemical adsorption.
- Micron rating determines what gets caught — lower numbers mean finer filtration.
- Inline hose filters, under-sink drinking filters, and whole-RV systems each filter water at different points and to different standards.
- A standard carbon filter improves taste and removes chlorine and sediment — it does not disinfect water or remove bacteria.
- Most cartridges require replacement every 2–6 months or after filtering 100–300 gallons, whichever occurs first.
What an RV Water Filter Actually Does
An RV water filter is a cartridge, usually made of pleated paper, spun polypropylene, or activated carbon, that sits between your water source and your RV’s plumbing. Its job is to physically block particles and chemically bind contaminants as water passes through, without adding anything to the water itself.
Think of it like a very fine strainer combined with a magnet for chemical compounds. Sediment, rust flakes, and sand get caught in the physical structure of the media. Chlorine, chlorine taste, and volatile organic compounds get pulled out through adsorption — a chemical process where carbon molecules bind to contaminant molecules as they pass by.
The result is water that looks clearer and tastes noticeably cleaner than what came out of the spigot, without any moving parts or electricity involved in most standard RV filters.
The Filtration Process, Step by Step
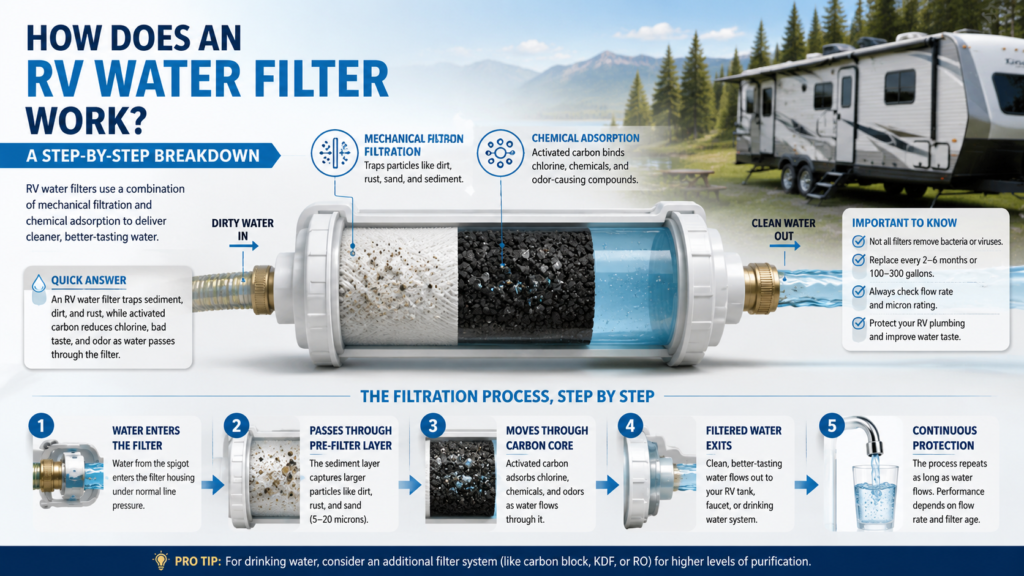
Here’s what happens between the moment water enters the filter and the moment it reaches your faucet:
- Water flows into the filter housing using the pressure already present in the RV water line. Many RV filters can handle pressures around 40–100 PSI, which is common with campground and municipal water connections. Because the water supply provides the necessary pressure, a typical inline filter does not require electricity or a separate pump.
- Water passes through the pre-filter or outer layer. This first pass, usually a pleated or spun-fibre sediment layer, physically strains out larger particles like dirt, rust, and sand down to roughly 5–20 microns.
- Water moves through the carbon core. Activated carbon, made from coconut shell or bituminous coal, has an enormous internal surface area. Chlorine, chlorine byproducts, and taste-and-odour compounds bind to that surface as water flows through.
- Filtered water exits through the outlet fitting. From here it either continues into your RV’s freshwater tank, feeds a dedicated drinking-water faucet, or heads straight to your plumbing, depending on where the filter is installed.
- The cycle repeats continuously as long as water is flowing — there’s no on/off filtration step, which is why flow rate and filter age both affect how well it performs.
What a Micron Rating Means
A micron rating measures the size of the smallest particle a filter can reliably trap, used to compare how fine different filters are. For reference, a human hair is roughly 70 microns wide—most RV sediment filters catch particles far smaller than that
| Filtration Method | Typical Micron Rating | What It Removes | What It Doesn’t Remove | Common Placement |
|---|---|---|---|---|
| Sediment/mechanical | 5–20 microns | Dirt, rust, sand, sediment | Dissolved chemicals, bacteria | Inline hose filter |
| Activated carbon block | 0.5–5 microns | Chlorine, taste, odor, some VOCs | Dissolved minerals, most bacteria/viruses | Inline hose or under-sink |
| Carbon + KDF media | 0.5–5 microns | Chlorine, chloramine, some heavy metals | Bacteria/viruses (not certified) | Under-sink drinking filter |
| Reverse osmosis membrane | 0.0001 microns | Dissolved solids, heavy metals, most contaminants | Nothing meaningful escapes RO — but it’s slow and wastes water | Under-sink or whole-RV system |
Save or screenshot this filtration comparison table — it covers every filter type you’re likely to find on an RV before you buy one.
If you want to know exactly which contaminants a filter can and can’t touch, what impurities do water filters remove breaks it down contaminant by contaminant.
Want this table as a printable PDF you can keep in your RV’s document folder? That’s exactly what our water-filtration cheat sheet newsletter drop covers — sign up below and it lands in your inbox.
Inline vs. Under-Sink vs. Whole-RV Systems — How Each Works Differently
These three filter types work on the same basic principle but sit at different points in your water path. An inline hose filter screws directly onto your fresh water hose before water ever enters your RV, protecting your plumbing and tank from sediment and chlorine at the source.
An under-sink drinking filter works after the water is already in your system, usually tapping a dedicated line to a separate faucet, and is built for higher-grade filtration since you’re drinking straight from it. A whole-RV system sits inline with your main water line and filters everything, including shower and tank water, before it splits to any fixture.
The tradeoff is straightforward: earlier placement protects more of your system, but later placement (like under-sink) can afford finer, slower filtration since it doesn’t need to keep up with your whole RV’s flow rate at once..
Where Should an RV Water Filter Be Placed?
The best placement for a standard inline RV water filter is between the spigot and your fresh water hose, before water enters the RV. This protects your entire plumbing system, not just one faucet, and it’s the setup most manufacturers design their filters around.
If you’re filtering drinking water specifically, a second filter under the sink, positioned after the main line splits, gives you finer filtration for water you’re actually consuming without slowing down water to your shower or toilet.
Avoid placing a filter after your freshwater tank if you’re filling from an unknown source—by then, any sediment or chlorine has already sat in your tank.
What It Removes — and What It Doesn’t
A standard RV water filter removes sediment, chlorine, and most taste-and-odor compounds, but it is not a substitute for water disinfection. Carbon filtration is built for aesthetic problems—the stuff that makes water taste, smell, or look bad—not for pathogens.
According to the U.S. Environmental Protection Agency, private and unregulated water sources can carry bacteria and other contaminants that basic carbon filtration isn’t designed to address. Filters certified under NSF/ANSI 42 handle taste, odor, and chlorine; NSF/ANSI 53 covers specific health-effect contaminants like lead and cysts—but neither certification means a filter disinfects water.
If your water source is a campground with a known municipal supply, a standard filter is typically sufficient. If you’re pulling from an unknown well, a lake, or a source you can’t verify, filtration alone isn’t enough—that water needs disinfection first.
How Long Does an RV Water Filter Last?
Most RV water filter cartridges last 2 to 6 months of regular use, or roughly 100 to 300 gallons, whichever limit comes first. Manufacturers print a gallon rating on the cartridge itself — that number is the more reliable guide than a flat calendar date, since usage varies so much between full-timers and weekend campers.
Filters that see heavier sediment loads, like well water or older campground plumbing, clog and lose effectiveness faster than the rated gallon count suggests. A drop in water pressure at your faucet is usually the clearest sign a cartridge is overdue, even before the gallon count is hit.
For a full replacement schedule and the warning signs that mean you should swap early, how to maintain a water filter walks through it in detail.
Do You Actually Need One?
Not every RV setup needs the same level of filtration—it depends entirely on your water source, not just whether you’re camping. Someone hooking up exclusively at full-service RV parks on municipal water has different needs than someone boondocking off unknown spigots or well taps.
Before you buy or upgrade a filter, it’s worth actually checking what’s in your specific water rather than guessing based on what other RVers use. How to test if you need a water filter covers the simple checks that tell you exactly what you’re dealing with before you spend money on equipment.
Common Mistakes and Troubleshooting
The single most common mistake is installing a filter and never checking flow rate afterward. A sudden drop in water pressure almost always means a clogged cartridge, not a plumbing problem—swap the filter before you start chasing pump issues.
Another frequent error: connecting the inline filter after a pressure regulator instead of before it, which can trap debris against the regulator’s diaphragm. Always filter first, then regulate pressure
Filtered water that still tastes off usually isn’t a filter failure — it’s more often the RV’s internal plumbing or a stale tank. Why does filtered water taste bad walks through the actual causes and fixes.
Finally, storing a used cartridge in a damp bay between trips lets bacteria grow inside media that’s no longer flowing water—always let a filter dry out or store it in a sealed bag if you’re not using the RV for weeks at a time..
FAQ
How long can I use an RV water filter?
Most cartridges are rated for 100 to 300 gallons or 2 to 6 months, whichever comes first. Heavy sediment sources shorten that lifespan considerably. Check the gallon rating printed on your specific cartridge rather than relying on a flat calendar reminder, since usage varies widely between full-time and weekend RVers.
How does an RV water system work?
An RV water system pulls water from either a fresh water tank or a direct city-water hookup, routes it through the plumbing to fixtures, and returns wastewater to gray and black tanks. A water filter is one component within that system, typically installed at the hookup point or under the sink, not a replacement for the tank and pump setup.
Where should an RV water filter be placed?
The standard placement is inline, between the water spigot and your fresh water hose, before water enters the RV. This protects your entire plumbing system rather than just one fixture. A second under-sink filter can be added specifically for drinking water if you want finer filtration at that one tap.
What Happens Inside a Water Filter During the Cleaning Process?
Water enters the filter housing under line pressure and first passes through a sediment layer, which physically traps dirt, rust, and sand through mechanical straining. It then moves through an activated carbon core, where chlorine, chlorine byproducts, and taste-and-odor compounds bind to the carbon’s surface through a process called adsorption. Clean water exits through the outlet fitting while trapped particles and adsorbed chemicals stay behind in the cartridge. This happens continuously as long as water flows — there’s no separate on/off cleaning cycle, which is why a cartridge’s performance gradually declines as it fills up with trapped material.
Does an RV water filter remove bacteria or viruses?
Standard carbon RV filters are not certified to remove bacteria or viruses. They’re built for sediment, chlorine, and taste, which falls under NSF/ANSI 42 certification. Removing pathogens requires a filter specifically certified under NSF/ANSI 55 or 58, or a separate disinfection step like boiling or UV treatment.
Is filtered RV water safe to drink?
Filtered water from a known municipal source is generally safe to drink after standard carbon filtration, since the main concerns there are taste and chlorine rather than pathogens. Water from an unverified source, like an unknown well or surface water, needs disinfection in addition to filtration before it’s safe to drink.
What to Do Next
Now that you know what’s actually happening inside your filter, the next logical step is figuring out whether your specific setup needs one at all — how to test if you need a water filter walks through the checks that answer that in a few minutes.
If you’ve already got a filter installed but something still seems off, why does filtered water taste bad and how to maintain a water filter cover the two most common follow-up problems RVers run into.